Optical Character Recognition (OCR) is the process of extracting text out of images. There are numerous open source engines out there which make it incredibly easy to integrate OCR into almost any kind of product. These engines, particularly neural network based ones, know how to extract text out of random images because they have seen thousands of examples of text and found a general mapping between images and the text they might contain. However, this means they work the best when given images which look like those they were trained on, namely black and white documents with pure text and little background noise and non-textual objects.
If you are trying to use OCR in a “natural scene” environment, then using an OCR engine out-of-the-box without any image pre-processing may not be so successful. Inaccurate OCR would make it difficult, if not impossible, to automate tasks which require finding text in images where blur, glare, rotation, skew, non-text, and a myriad of other problems exist. Tools like Amazon’s Textract and Google’s Cloud Vision make these problems go away, but they have their limitations (not to mention you have to pay for them). Thankfully, there are plenty of steps we can take to pre-process images for an open-source OCR engine and achieve comparable levels of accuracy.
The Goal of Pre-Processing
Images work best with OCR engines when they look similar to the images the engine was trained on. Namely, they have:
- Very little non-text objects
- A high contrast between the text and the background
- Text with clear edges
- Little noise/granularity
- Horizontal Text (no rotation)
- A birds-eye view of the text (no skew)
Depending on what system you are developing for, some of these goals will be harder to achieve than others. To demonstrate how we can achieve some of these goals, I’ll be using Python’s OpenCV module because it can achieve most of these goals in a few lines of code. I’ll use Google’s Tesseract OCR through the PyTesseract Python module for the OCR.
You can follow along with this Jupyter notebook. Please note that I use several custom functions/abstractions which make the tutorial code more compact. While most of these functions are either for setup or to apply an OpenCV function to a set of images, others such as the EastDetector are quite complex. If you are curious, I have tried to document it as clearly as possible in the repository for this tutorial.
Text Localization
Lets say we’re trying to find all of the book titles and author names in this image.
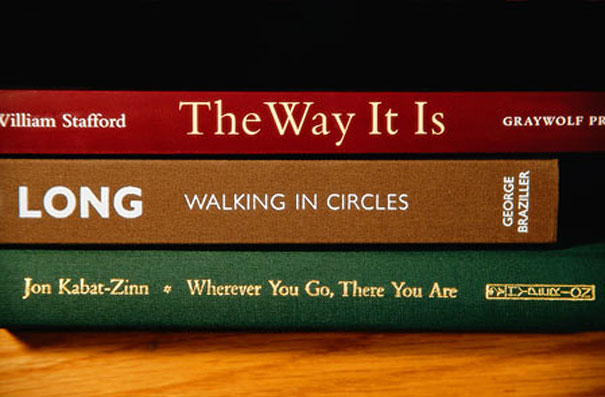
If I put this straight into Tesseract, it doesn’t do very well.
books = load_image("Images/books1.jpg")
print(pytesseract.image_to_string(books))
returns
DR) The Way It [5 — cxsrwour
LONG  WaAtkine In circtes HF

RCA Maca CRC Usa CW ta Sohwxcrceey]
None of these are very accurate. There are a lot of extra, random letters that are clearly not part of the book or author titles. Tesseract is having a tough time because of the various fonts and colors on the books. It can’t properly chunk the image into pieces it can understand, so we have to help it along. The first and easiest thing we can do is give Tesseract only the pieces of the image which contain text in them.
detector = EASTDetector()
slices = detector.get_slices(books)
titles = [pytesseract.image_to_string(img) for img in slices]
show_images(slices, titles=titles, cols=3)
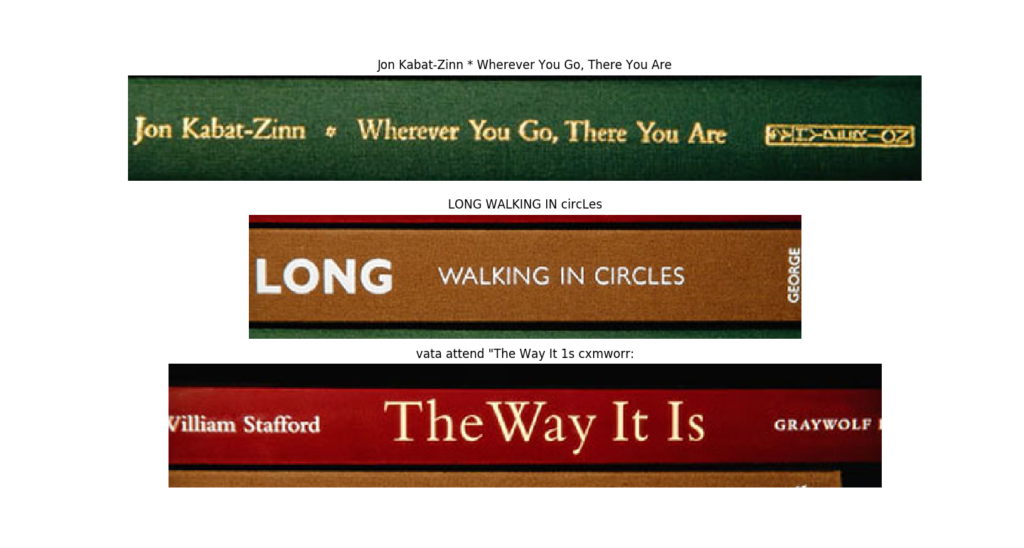
As you can see, by passing in the spine of each book individually instead of the image all at once brought a drastic improvement. What was gibberish before is now recognizable text.
Note: I located the book spines using the EAST Text Detector. PyImageSearch has a fantastic tutorial on how to use it, so I won’t go into much detail here. If you are curious, you can check out east_detector.py in the repository to see how my EASTDetector class uses the model to generates bounding rectangles for the text.
Notice that while EAST separated all the books from each other, it didn’t break text separated by large spaces into chunks. That is why for The Way It Is, Tesseract is still having trouble reading it. If I narrow down the frame specifically for The Way It Is, then Tesseract can finally read it properly.
narrowed = binarize_images(slices[2:], black_on_white=False)
narrowed = narrow_images(narrowed)
titles = [pytesseract.image_to_string(img) for img in narrowed]
show_images(narrowed, titles=titles, cols=3)
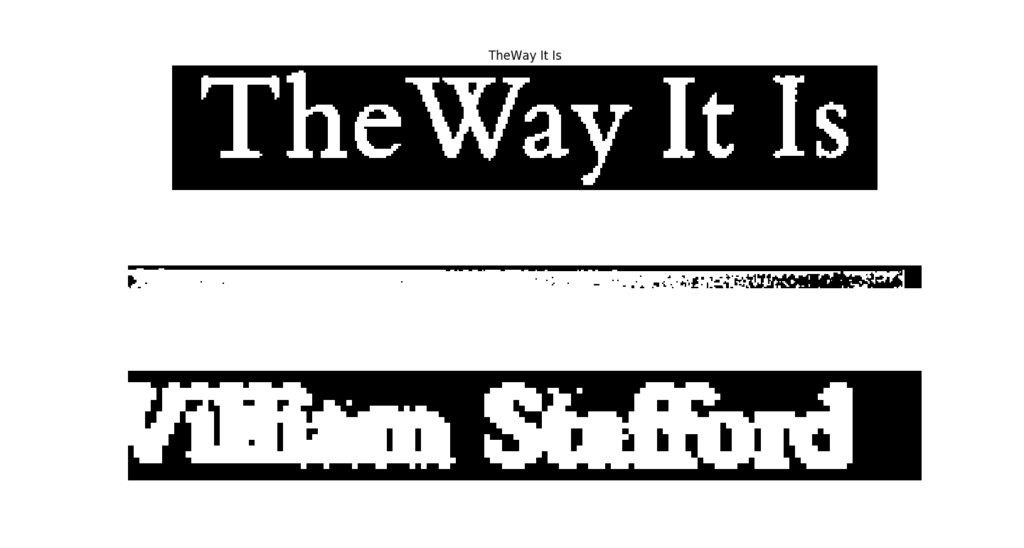
Narrowing the frame on just The Way It Is book gives us 3 frames. Notice that the frame which contains the title is very clean, so Tesseract can read it perfectly. Meanwhile the frame containing the authors name is quite blurry and noisy, so Tesseract can’t read it. This results from the fact that the name is somewhat blurry in the original image to begin with, bringing us to an important lesson in OCR: sometimes, there is only so much you can do.
Note: I am choosing to not go into details about how I narrowed the image frame in the narrow_images function here because it uses a technique called dilation which I will cover later in the tutorial. I will go into the details of this function after I introduce dilation.
If you read the code above, you’ll notice I called a function binarize_images
before I narrowed the image frames. This puts the image through a
process called Image Binarization, the preprocessing step which I will
cover next.
Image Binarization
After narrowing the search field, one of the easiest pre-processing steps is to binarize the image. Binarization means converting each pixel to either black (0) or white (255). These are called binary images. We do this because OCR Engines like Tesseract perform well on images with a high contrast between the text and the background, and nothing sticks out more than white text on a black background.
Binarization can be achieved in many ways. For example, you can set a simple threshold (i.e every pixel > 127 is set to 255 and every pixel below is set to 0) or you can do something more complicated (e.g for each pixel, take the median of surrounding pixels and apply a threshold to that). However, in natural scenes, it can be hard to find a single threshold which works for every image. It is much better to instead calculate the threshold dynamically. One way of doing this is known as Otsu’s Binarization. It assumes that pixels are bimodally distributed and decides the best threshold is in the middle of the two modes.

Thankfully, OpenCV has functions to do this for us.
image = cv2.cvtColor(image, cv2.COLOR_RGB2GRAY)
_, thresholded = cv2.threshold(image, 0, 255, cv2.THRESH_BINARY_INV + cv2.THRESH_OTSU)
cv2.THRESH_OTSU tells OpenCV to use Otsu Binaration, and cv2.THRESH_BINARY_INV will make dark parts of the image white and light parts of the image black. Notice that we have to convert the image to grayscale before binarizing it because you can’t binarize a 3-channel color image.
Notice that my implementation of the binarize_images function is not as straight forward as using cv2.
gray = cv2.cvtColor(img, cv2.COLOR_RGB2GRAY)
_, binary = cv2.threshold(gray, 0, 255, cv2.THRESH_BINARY_INV + cv2.THRESH_OTSU)
if np.mean(binary) > 127:
    binary = cv2.bitwise_not(binary)
After binarizing the image, I compute its mean. If the mean is greater than 127, then I take a bitwise not of every pixel. I do this because the THRES_BINARY_INV flag will make dark parts of the image white and vice versa, so if our text is white, then it will become black in the binary image. This will be a problem for our later preprocessing steps. If the image is predominantly white (i.e most pixels are > 127), then most likely the text is black, so I do a color-flip to make the text white.
Let’s try out binarization on a new image.
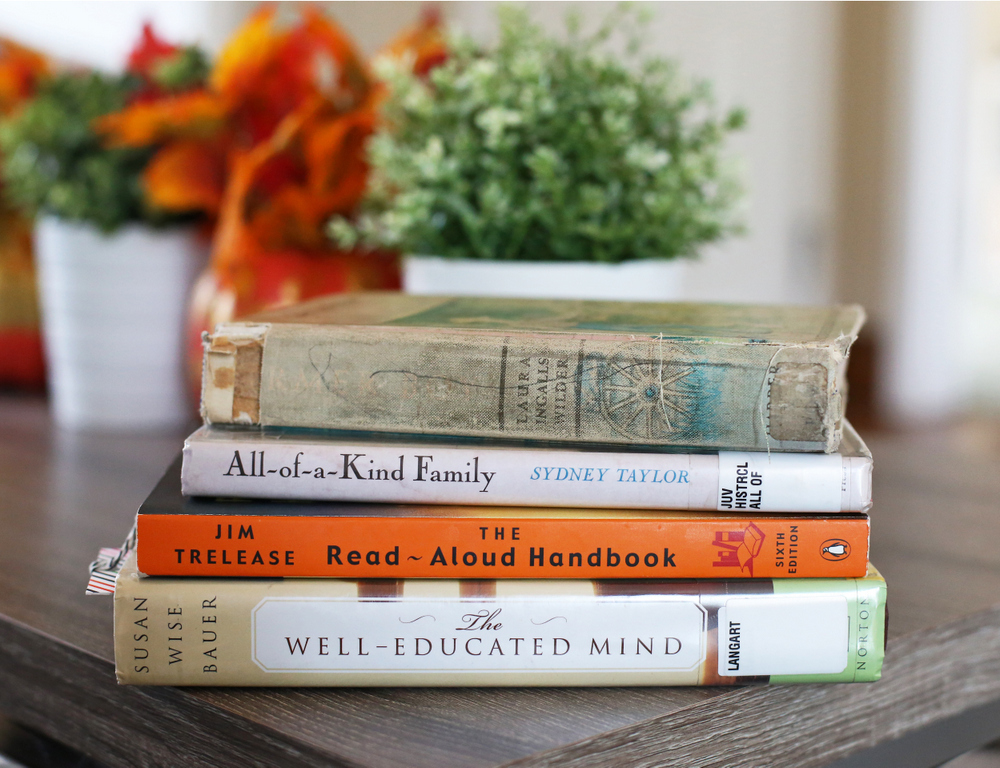
detector = EASTDetector(small_overlap=0.75)
slices = detector.get_slices(books
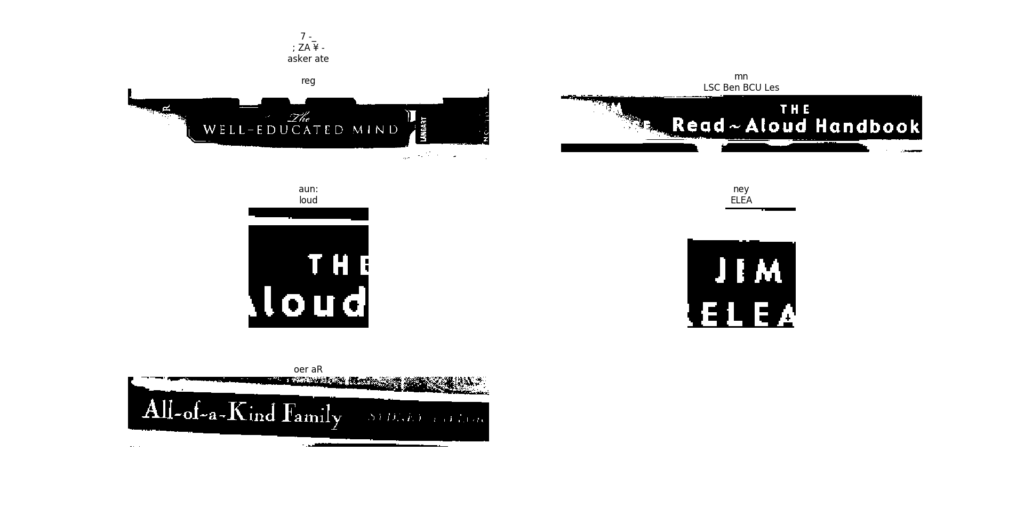
binarized = binarize_images(slices, black_on_white=True)
For comparison, here is what I get if I don’t binarize the images after using EAST.
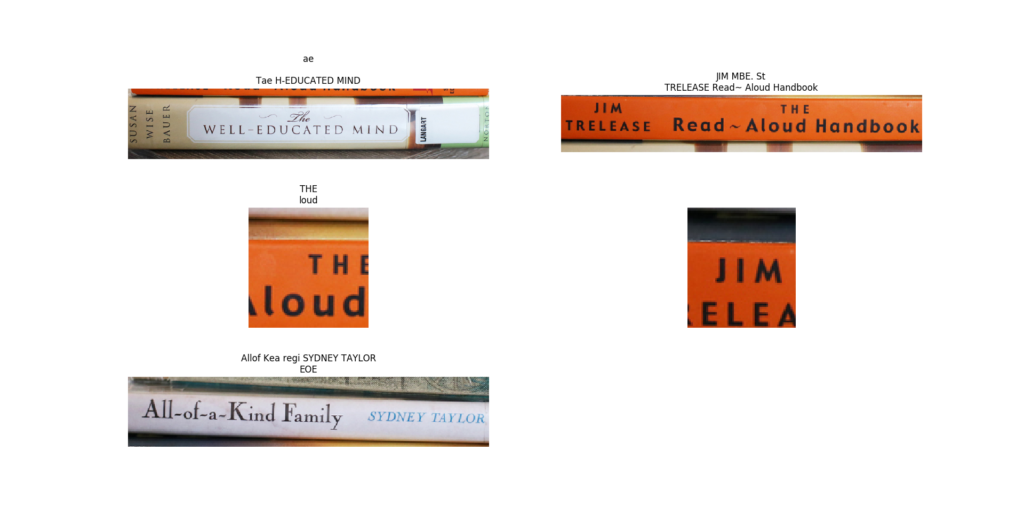
Notice for most of the books, binarization actually made the OCR worse. For others it made OCR possible, and for yet others, it made OCR impossible. This is another common lesson with out-of-the-box OCR models: pre-processing will work differently for every image. It might even take you in the wrong direction.
Binarization also appears to add some noise into the image that wasn’t there before. This is usually fine because our other preprocessing steps will take care of it for us.
Blurring
While it seems counter-intuitive, slightly blurring an image can actually improve OCR, especially after the image has been binarized. A binarized image has pixels which are either 255 or 0, so this can add graininess/noise into the image even though it makes the contrast very sharp. OCR does not perform well under noise, so we should try an remove as much noise as possible. Applying a slight blur accomplishes this.
Let’s focus on the All-of-a-Kind Family book. When it was binarized, Tesseract read “oer Ar” (see above). After applying a blur,
img_blurred = cv2.medianBlur(img, blur_weight)

To the human eye, not much has changed to the image. But clearly, the blurred version is a lot easier for Tesseract to work with!
The specific type of blur I used was a Median Blur. Median blurs compute the median of neighboring pixels to replace the current filter. Another blur that is commonly used is the Gaussian blur which computes a Gaussian distribution over the neighborhood and uses that to replace the current pixel.
Dilation
Sometimes, the text we want to read is in an extremely thin font. Image dilation is a technique which can help us with that. It works by applying a kernel to the image. Think of a kernel like a sliding window. As the window slides over the image, it replaces the current pixel with the maximum value of all pixels inside the window multiplied by the value of the kernel which falls over them. This is what causes white regions to enlarge.
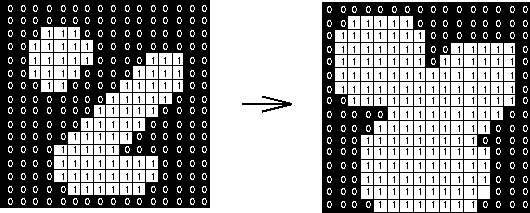
For the book The Well-Educated Mind in the image above, the OCR output on the binarized image was gibberish, and the OCR output on the original image was not the exact title (“Tae H-EDUCATED MIND”). If we dilate the image, we can give more body to the text so Tesseract can see it easier.
blurred = blur_images([binarized[0]], blur_weight=1)
dilated = dilate_images(blurred, kernel=np.ones((5, 5), np.uint8))
Notice that I blurred the binary form of the image before dilating it. This was to smooth the image first. Otherwise, noise/graininess which the binarization introduced would be dilated as well, making the output image blocky and unreadable. The particular kernel that I used was a 5×5 unit square. This moderately expands the text in the x and y directions.

As you can see, Tesseract could properly extract the title of the book from the dilated image.
Frame Narrowing
Earlier in the tutorial, I used a function called narrow_images to get even more specific with the part of the image I was feeding into OCR beyond what EAST was giving me. Now that we have covered dilation we can go into how it works.
def narrow(image, convert_color = False, binarize = True):
    """
    Draws narrower bounding boxes by heavily dilating the image and picking out the 3 largest blocks
    """
    original = image.copy()
    if convert_color:
        image = cv2.cvtColor(image, cv2.COLOR_RGB2GRAY)

    if binarize:
        _, image = cv2.threshold(image, 0, 255, cv2.THRESH_BINARY_INV + cv2.THRESH_OTSU)
        if np.mean(image) > 127:
            binary = cv2.bitwise_not(image)

    box_kernel = np.ones((5, 25), np.uint8)
    dilation = cv2.dilate(image, box_kernel, iterations = 1)
    bounds, _ = cv2.findContours(dilation, cv2.RETR_EXTERNAL, cv2.CHAIN_APPROX_SIMPLE)boxes = []for cnt in bounds:
        x, y, w, h = cv2.boundingRect(cnt)
        region = original[y:y + h, x:x + w]
        boxes.append(region)boxes = sorted(boxes, key=lambda i: -1 * i.shape[0] * i.shape[1])
    return boxes[:3]
The first step is to convert the image to grayscale and binarize it. This is a requirement for what we will do later: contouring. Once we have the binary image, we then apply a heavy dilation (the kernel is a 5×25 rectangle). This expands the bright areas of the image in the x direction so close regions of text blend together. At this point, groups of text look like solid blobs of white.
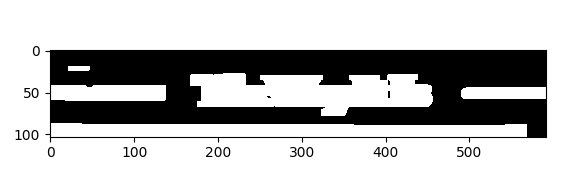
We then find the external contours of these blobs and they become the parts of the image containing text. External contours are the edges which define the white blobs (i.e where the white meets the black). This is accomplished by OpenCVs findContours function. We return the 3 largest of these blobs (to remove any blobs which arise from noise or are not text).

Conclusion
This article has barely scratched the surface of image pre-processing. In addition to binarization, blurring, and dilation, there are numerous other techniques which are used to remove noise from images and make it easier for OCR systems to work with them. Deskewing, erosion, filling, and opening are some other operations which might be used. For most tasks, however, the techniques covered in these guidelines should be sufficient.
In general, the techniques you will use are heavily dependent on the system you are building. Because each processing step does not guarantee to improve the OCR quality, it is extremely difficult to build a set of pre-processing steps that works perfectly for all the types of images you want to recognize. There are multiple ways to handle this issue. If you care mostly about speed and not accuracy, there is no point doing any pre-processing because Tesseract can handle lots of images without needing additional work. If you care strongly about accuracy, you might design a pipeline which sequentially applies different transformations to an image until your OCR engine outputs something understandable. However, be aware that a more accurate system will be slower (usually).
Since building OCR systems with out-of-the-box models requires a lot of engineering, if you have a lot of labeled training data, you might be better off training an OCR Engine yourself using transfer learning. That would produce a higher accuracy for your particular types of images and would solve the problem of pre-processing. The downside to that, of course, is the difficulty in gathering the training data and make sure the model learns.
At the end of the day, there is no “right” answer as to how to get OCR to work with an image, but there are definitive techniques which you can try. It is just a matter of figuring out which transformations in which order are the right ones for your particular image.
For more information on image processing, check out OpenCV’s documentation for their built-in functions. If you are curious about Tesseract, you can check out the repository FAQ for the different parameters it takes.
I hope you found this tutorial useful. You can see all of the code and the Jupyter notebook I used for the examples here.
Cross-posted from https://medium.com/@anmolparande/a-hitchhikers-guide-to-ocr-8b869f4e3743
