
This post will help with setting up and understanding Android Studio before we dive into writing code and making apps. I highly recommend following along with this article, since it’ll provide enough foundational context for building Android projects in the future.
Installing Android Studio
Download Android Studio from here: https://developer.android.com/studio/. If you’ve downloaded it a while ago, it would be worthwhile to reinstall since Android Studio is difficult to update from very old versions. That process is relatively simple.
Running your first app
When you first open Android Studio, you should arrive at this screen:
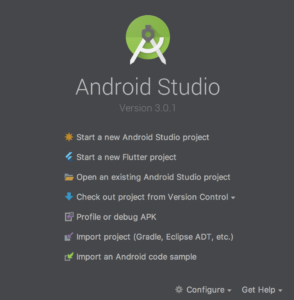
If you had any projects open, make sure to close them! Click on Start a new Android Studio Project and you should arrive here:
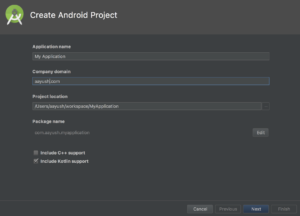
At this screen, you can name this project anything you desire, but picking a reasonable (and unique!) package name would be ideal if you plan on launching the app to the app store. Make sure to deselect the Kotlin support checkbox if you’re planning on following along in Java.
After this, you’ll see another screen asking you to pick your minimum version of Android, and if you click Help me choose you’ll see a distribution chart.


Choosing these is up to you. As the distribution screen shows, newer versions of Android support more features that will make your life easier as a developer, but in return, also support fewer devices. If you’re looking to support the most people, I recommend 19. Version 21 is great if you want a lot more features than 19 but are okay with not supporting everyone.
On the next Add an Activity to Mobile screen, select Empty Activity and finish making the app. Try to run the app by clicking the play button at the top of the application. It looks like this:
![]()
The app will first have to build into something executable by your Android device (which is what the hammer represents), and will probably not be able to build initially since you have to install the Software Development Kit (SDK) dependent on what version of Android you’re targeting. Since there are so many different SDK versions you might want to run, Android Studio doesn’t come preinstalled with any. That also means Android Studio won’t know how to build the app. Troubleshooting your first build isn’t too difficult, since every time a build fails due to a missing component, the error message will provide a prompt to install whatever you’re missing and you can try again. Keep attempting to run the app until it succeeds!
If you don’t have a device to run the default app on, the run screen will have a link to the Virtual Device manager, where you can create and use virtual devices. Once you have the default “Hello, world!” app running, you’re ready to move on.
Android File Structure
If you’ve created the project successfully, you’ll be greeted with this file tree on the left (make sure you’re viewing it in “Android” mode and not “Project” mode, as specified in the dropdown at the top):
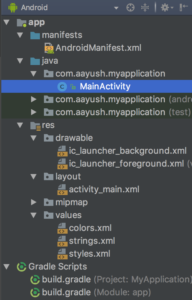
It might seem daunting at first, but you only have to worry about the directories expanded in the screenshot above!
manifests
The manifest file defines the different activities (like screens) and broadcast receivers within your app and lets you decide which activity to label your MainActivity that you launch when the app first opens. You also add your permissions that you want to give to the app, like internet or storage.
java/packagename
This is where you store all your Java / Kotlin code, and effectively where all the source code of the app goes. Currently, there should be one Java file here called MainActivity. To create an Activity, DO NOT create a Java file. You should right click the packagename folder, go to New, and select New Activity. This will do some extra setup like create a default layout file and register it in the manifest, saving you a lot of extra steps.
res
The res folder is where all visual resources and other assets are stored like layout files, images, audio, icons, strings, fonts, etc. The files in here are typically in XML, a language reminiscent of HTML. Don’t worry, it’s not a new language you have to learn! All the files are linked to Java using a special reference library called R.
The drawable folder is where images are stored. They receive a unique id that can be referenced with R.drawable.filename, but it’s also possible to reference them using a string value for the filename (although this involves receiving the above id, which is an integer value.) While you can just store plain old image files, custom xml files are supported as well, allowing for complex drawables (e.g. a transparent circle that has a white ripple when pressed).
The layout folder describes how all of our screens and their parts should be laid out. These can also be referenced by R.layout.layoutname, but are more deeply linked with their associated java files. To see what I mean, in MainActivity.java you can find the line
setContentView(R.layout.activity_main);and in activity_main.xml you can find the line
tools:context="packagename.MainActivity"For the values folder, you shouldn’t add files directly to this folder, but instead add to the existing files. Similar to the other folders, Strings in strings.xml can be referenced with R.string.stringname in Java and @string/stringname in XML. These files are used to be able to reference values that may change depend on who’s using the app: for example, you might want user facing strings to be in a different language depending on the user’s default language, and you might want dimensions to be different for tablets. It’s good practice to save these values in their corresponding files regularly.
gradle
Gradle is used to compile the app together and link together the Java and res folders. It also links together external libraries and APIs (including most of the core Android libraries!)
Using Android Studio
There’s several important features of Android Studio that need to be covered before we can get started writing any code.
General Shortcuts
These are shortcuts that can generally be used throughout the app. These shortcuts are for Macs, although their equivalents should exist for Windows in similar combinations.
Autocomplete
Android Studio will offer to autocomplete anything it can. This ranges from variable names to entire code blocks. Try to utilize this as much as you can, as it can significantly speed up having to type everything out, and ensure you never make any typos.
⌘ + Click
This will generally take you to the declaration of whatever you are clicking. This is useful if you’re looking at a method or variable, and you’re not sure where to find it to see what it does. If you’re at the definition, this is also useful since it shows all the places where the method / variable is being referenced.
Alt + Enter
Many times, Android Studio will recognize that something is wrong, but will be reasonably confident that it knows how to fix it. For example, if a red variable is underlined in white (it needs to be imported), highlighted yellow (potentially causing bugs / is bad practice), grayed out (it’s never used) then you can use this command to auto-fix the error. Consider this the spell check for your code.
Other useful things
- Refactor (rename all instances of) a variable with right click -> refactor -> rename
- ⌘ + [ to go back to wherever your cursor was before
- ⌘ + ] to move it forward
- ⌘ + O to search through Java files
- ⌘ + / to comment out with single line comment(s)
- ⌘ + Shift + / to comment out with multiline comment
- ⌘ + F to search in file
- ⌘ + Shift + F to search in all files
- ⌘ + R to find and replace in file
- ⌘ + Shift + R to find and replace in all files
Layouts
Layouts live in the res folder, and are written in XML. There is a visual editor as well, which is more convenient for editing your layouts when they are less complex.
Views
Any component on your screen, like a block of text, button, image, input field, etc, are called Views. Views have common attributes like height, width, and background, which can be set by default in the layout file, or set while the app is running in the Java code (this is called programmatically changing an attribute). Any View can also be clicked and have code executed when it is clicked.
Different types of Layouts
While each layout is a single file, layouts also represent a general View to contain other Views, meaning my activity_main.xml for MainActivity has only one root ConstraintLayout, but that in turn could have LinearLayouts, FrameLayouts, etc within it. The basic layouts are
- LinearLayout: Displays the Views in order, with attributes controlling the “weight”. For example, if there are two Buttons with weight 1 and weight 2, and a vertical orientation, the first Button will take up 1/3 the height of the layout and the second will take up 2/3.
- FrameLayout: Wraps a single View. This is pretty common for workarounds, for example, I’ve used this before to wrap an input field that I want to be clickable, but not something you can edit. To do this, you could make the FrameLayout clickable, and the EditText unclickable.
- ScrollView: Wraps a single View, but allows it to scroll if it doesn’t fit. Typically this single View is another layout to allow for more than one item.
- ConstraintLayout: Place Views relative to each other using attachments called “constraints”. There are different types of constraints and it’s a relatively complex system, but Android Studio’s versatile visual editor allows for easy building of complex layouts.
- RelativeLayout: Relatively (hey gottem) outdated because of the newer and cleaner ConstraintLayout, but still widely used in the industry. I honestly don’t know how to use these, but you’re probably not ever going to want to create a new RelativeLayout.
- AbsoluteLayout: A relic of prehistoric times. No idea what they’re for since they were obsolete way before I learned Android. You can find them in museums, but don’t touch the glass.
Constraint Layout Editor
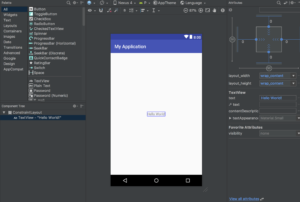
Let’s try to break down what we see here step by step. You may have a second blueprint screen showing, but I like to disable that by going to the layers icon on the top left of the editor. In the Palette, we see all the Views available to use divided into menus. We can add something to the screen by simply dragging and dropping. In the Component Tree, we can see the hierarchy of the Views that we currently have. It starts out pretty simple, with a ConstraintLayout containing a sample TextView.
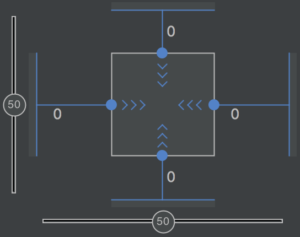
On the right is where it get’s more interesting. The box above represents the focused view, in this case we are focused on the “Hello World!” TextView. The dots on the sides represent constraints, which act like springs. You can delete the constraints by clicking these dots – try deleting the bottom constraint and see the TextView rail to the top left! However, it might look a little ugly with the text actually touching the top, so we might want to add a margin by setting the top margin to 8 or 16, by clicking the 0 on top. Margins are just that though – only used to add a little padding. If you want to position things in a certain place, try using the skew bars (currently set to 50%) instead of forcing the position with large margins.
The fields below the box represent common attributes (Note: for TextViews, your screen probably has many more text fields.) We can access even more attributes like background and clickable by clicking on “View all attributes”, but most of these are intuitive, so we’ll focus on the main two right now – layout_height and layout_width. There are three types of values you can put here: wrap_content, meaning the View will wrap whatever is in it, match_constraint, meaning the View will take up as much space as the constraints allow, and a fixed size, measured in dp, a way of measuring distances independent of the device’s pixel density (e.g., 128dp). I highly recommend not using fixed sizes unless you are working with images, so that your Views will be more robust to differently sized screens.
In the middle is the visual editor itself, which allows you to drag constraints from your View to another View. For example, if we want another View to be directly under this existing one, we would drag a TextView in from the Palette, drag a constraint from the top of the new View to the bottom of the old view, and add side constraints to the sides of the parent layout to center it. Don’t forget to add at least one horizontal constraint and one vertical constraint to anything in a ConstraintLayout, or its position will be in an undefined location.
XML
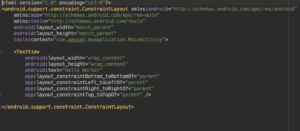
While you can stick to the visual editor at first, eventually it might be easier to start using the text editor. While it’s not necessary to learn it, XML is pretty straightforward to read and write, and we can clearly see how our attributes are attached to the Views here. In a ConstraintLayout the order of these Views doesn’t matter (what does is what each View is constrained to), but be aware that in a LinearLayout, the order in the XML represents the order in the LinearLayout.
Asset Studio
If you’re messing around with the editor and attempt to add an ImageView, you’ll notice that it asks you to add a default image, and you’ll also notice that all the built in icons look very ugly. Don’t fret, the cooler looking icons are hidden away in the Asset Studio. If you right click the drawable folder, go to New, and select “Vector Asset”, a dialog will pop up asking you what you want to add. Click on the icon next to Clip Art and you’ll arrive at the Asset Studio!
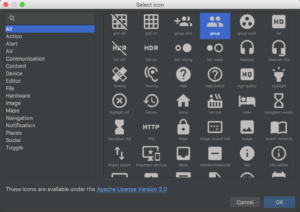
There are many, many icons here and you probably won’t need to make your own until you start making serious apps. In addition, as vector assets, these are defined as vectors and have infinite resolution! The color can be edited by going into its XML file and changing the color value from #FF000000 to whatever you need.
Java
Anonymous Classes
While we won’t be getting into any actual coding in this lesson, it’s important to know a few lesser known nuances of Java that Android takes advantage of. The first, and most common, is the anonymous class. For example, to define behavior when clicking an object, you have to pass in an object implementing the OnClickListener interface with an onClick method defined. Most of these are only used once however, and anonymous classes allow you to define these inline. Here’s what I mean:
findViewById(R.id.button).setOnClickListener(new OnClickListener() {
    @Override
    public void onClick(View view) {
        // do stuff
    }
});
The parentheses are for instantiating the object (pass in variables if you have a constructor), and the methods are overridden in place. Seem like a lot to remember? Head into the onCreate method of your MainActivity and try typing this at the bottom of the method – not copy pasting. As you type the word “OnClickListener”, Android Studio will offer to autocomplete the whole anonymous class for you!
Inheritance
Just a heads up, inheritance is a large part of production level Java code in general. For example, if we Google “activity Android”, we can see from the first result that an Activity is a ContextThemeWrapper which is a ContextWrapper which is a Context, and implements a whole bunch of interfaces. For a lot of Android, you’ll mostly just be learning how to deal with these prebuilt frameworks, which methods to override and which to call.
Nullable and NonNull
While these are a separate dependency, Android uses these annotations quite extensively to mark when parameters / return values shouldn’t be null and when it’s ok for them to be null. If Android Studio ever complains that a line could cause a NullPointerException, it might be because you’re using a value from a Nullable method, or passing in a potentially null value to a NonNull parameter. Try to avoid these situations by using if statements to ensure null values have separate behavior.
Kotlin
As you may have noticed, most of these tutorials are in Java, instead of Kotlin, despite the latter being the preferred development language for Android applications. The reason for this is largely because most people have had prior Java experience which allows for Android development to have a lower barrier of entry. That said, Kotlin as a language still looks quite similar to Java and if you’ve worked with various programming languages before, Kotlin isn’t too hard to pick up.
In the earlier example of setting an onClickListener, the Kotlin version looks much like this:
val button = findViewById(R.id.button) as Button
button.setOnClickListener {
  // do stuff
}
As you can see, the syntax doesn’t differ too drastically. Stay tuned for articles about developing in Kotlin.
Other Tools
Android Studio has a couple other tools that can take some getting used to, so here are some quick descriptions. They can be found in the bottom bar of Android Studio.
Logcat
The Logcat is a tool that functions like System.out in traditional Java, except each log message has a tag as well as the real text (the tag is usually the name of the Activity you’re logging from, although it can be whatever.) There are 6 levels of logs and here they are in increasing degree: v for Verbose (used for little things), d for Debug (used for messages only to be seen when debugging), i for Info (used for info), w for Warning (used for situations that are not ideal, but not an error), e for Error (used when something is indeed wrong), or Assert (used to log events that should never occur). You can filter the minimum level you want to see in the Logcat. It’s also very useful to check crashes, since Android Studio will provide line numbers you can go to and provide the full stacktrace!
Version Control
Github and version control couldn’t be easier with Android Studio. Take a look below to see what I mean:
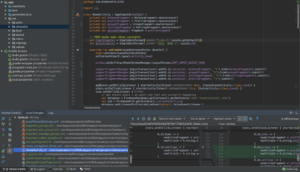
In the very bottom right (cutoff the screenshot) is a menu you can use to quickly checkout an existing or new branch. While editing, additions are marked in green and removals / edits are marked in blue near the line numbers. Clicking these will allow you to see what used to be there and give you the option to revert it. Right clicking in the line numbers area and selecting “Annotate” will show you who wrote each line and when.
The version control tool itself is even more useful! It shows all new and changed files, and selecting the “Preview Diff” icon on the left toolbar will open up the viewer on the right, which will quickly allow you to revert changes (the little white arrow on line 116). If there’s a merge conflict, this viewer will have a “Resolve conflicts” button on top which will open a GUI to accept either your changes or the existing changes, an extremely useful tool!