
Java Review
In order to learn Android development, you’ll need to know Java. Although we won’t go over everything Java related, we’ll go through a quick refresher.
Data Types
Declaring Variables
In Java, variables are declared by stating the type and then the name of the variable, and they are assigned with = and then the value you want to assign to it. Variables do not change types! For example,
int yearInt = 2017;
String str = null;
float gpa = 4.20f;
String year = "2017";
year = yearInt; // does not compile, can't assign int to String
year = "2016";
char c;
c = 'a';
Primitive Data Types
Primitive data types store raw data in a fixed amount of space, and are always lowercase in Java. Examples include
int/longfor integer values (Ex.12/15L)float/doublefor decimals (Ex.4.20f/0.0)booleanchar- other ones that are hardly used (
byte,short)
Other non primitive data types are all children of the Object class, and do not directly store the values they represent (they store an address that points to the value.) As a result, using the == operator will usually not work, and values are instantiated to null, which doesn’t point to anything. Attempting to invoke a method on a null value will raise a NullPointerException, or NPE.
Methods
All functions belong to a class, so we call them methods. Methods must be called from an instance of a class unless they are specifically marked as static. Static methods must be called from the class itself (like Math.round()), and effectively do not belong to the object.
Example of a method in Java:
class Adder {
    public static int addOne(int x) {
        return x + 1;
    }
}
...
Adder.addOne(3); // returns 4
Loops
There are three types of loops in Java:
for (int i = start; i < end; i += 1) {
    //do stuff
}
for (Object obj : objList) {
    //do stuff to obj
}
while (condition) {
    //do stuff
}
Classes
Classes are a model for a new type of object that you want to work with. Classes can be children of other classes, and can be parents of others. All classes are children of the Object class and therefore have the methods hashcode() and toString(). Here is an example of a simple class:
class Rectangle extends Shape {
    int width;
    int height;
    public Rectangle(...) {...}
    public int getWidth ...
    public int getHeight ...
    @Override
    public int getArea ...
}
Objects
Objects are instances of the classes. While the above class is just an idea or template of a Rectangle, we can create a our own Rectangle rect with its own properties.
Rectangle rect = new Rectangle(3, 4);
rect.getArea(); // returns 12
Anonymous Classes
Sometimes you want to extend an abstract class or interface for just a single object in Java (something very common in Android). These are called anonymous classes and have their own unique syntax.
button.setOnClickListener(new View.OnClickListener() {
    @Override
    void onClick(View view) {
        // do stuff
    }
});
Basic Git
What is Git?
Git is a solution for version control – the idea that to prevent errors, development code should be kept separate from working code to prevent bugs. It also makes collaboration much easier in larger codebases. Despite its similarities to Google Drive, Git is not an offline storage solution, and should never be treated as one.
In version control, there is typically a master, prod, or release branch (a version of your codebase) that only contains ready to deploy features. You can branch off of this to add your own features or work on bugs, so that you can mess around while the working version of the app still exists and (more importantly) people can work on their own features in parallel.
Once you’re done with your code and you think it’s good to add (or merge) to the master branch, you have two options:
- Push your code to master – you may get a merge conflict which you have to manually resolve, but Git can handle minor changes.
- Make a pull request – ask for someone to review it and when everyone’s good to go, you or someone else with write access can merge it in.
Git also allows you to manage versions on a single branch too, every time you push something to Github, it’s stored as a diff, only remembering the changes you made from the last version (or commit). You can revert to any commit at any time, a useful feature if you make a mistake. Good practice is making commits whenever you get some task completed or some feature working. Clear commit messages of what changes were made are also helpful in this case.
Github
Serves as a remote location for your git “repository”. You can add collaborators, write a wiki, check branches, and manage pull requests from here. Typically employers will check your Github, so it’s good to have your projects on Github even if you’re working solo and don’t need version control. It’s not a Google Drive alternative so you shouldn’t (though you can) edit code on Github.
Common Commands
git init- Enables git commands in the current directory and all subdirectories
git remote add origin https://github.com/...- Adds a remote location for your code called “origin” linking to the given URL. Doesn’t actually interact with it here.
git clone (-b branchName) https://github.com/...- Clones the code at the URL’s master branch. To clone a specific branch, use the -b
git checkout (-b) branchName- Creates and enters a new branch with your current changes with name “branchName”. If the branch already exists, ignore the -b
git add -A- Saves the state of your code and makes it ready to commit
git commit -m "first commit"- Commits the changes with message “first commit.” Commits are accessible even when more are pushed on top, so use useful messages.
git push origin branchName- Pushes the commit to the specific remote at the specific branch. Push often to your branch to avoid losing code! You can also push to master, though it’s better to make a pull request through Github.
git pull origin master- Pulls the code from master into your current code. If you’re working on a feature that someone else has edited, you will have to pull and resolve any conflicts to get that code.
git stash- Stashes away the current uncommitted changes you have. Very useful when you’re in the middle of something that you don’t want to push, since git won’t allow you to pull from the remote if you have uncommitted changes. After doing what you want, you can reapply those uncommitted changes with
git stash pop
- Stashes away the current uncommitted changes you have. Very useful when you’re in the middle of something that you don’t want to push, since git won’t allow you to pull from the remote if you have uncommitted changes. After doing what you want, you can reapply those uncommitted changes with
Intro to Android – Basic Snapchat clone
This walkthrough will assume that you have read and understood the previous lesson. You should be comfortable with using the ConstraintLayout editor before you continue. To begin, create a new Github repository named “BasicSnapchatClone” (without a README). Create a new Android project with the same name, without Kotlin support, with min API 21, and one empty activity. Once it is initialized, follow the instructions to create a new git repository (git init, git add, etc).
The intention of the app you’re creating is to have a textbox and a button. Pressing the button will open your camera, and open a screen with the text overlaid onto the image, sort of like Snapchat.
Views
Open res/layout/activity_main.xml. In the visual editor, we can see a single TextView in the middle, and if we click on it we can View and edit its properties, including its constraints, text, font, and color. For now we’ll remove this and add an EditText, a special type of TextView that acts as an input field. I’ve constrained mine to the left, right, and top of the parent, making it top and center. Take note of the “id” field – changing it won’t do anything for now, but it will be important in the next part.
Note that in our visual editor, EditText doesn’t show up, but we see many different kinds of EditTexts like “Plain Text” and “Password”. For now we’ll just add the plaintext field. Remove the default text and add text into the “hint” field. Run your app and play around with the EditText!
Programmatically Updating Views
For this part, add a Button whose top is constrained to the bottom of our EditText, and whose sides are constrained to the sides of the EditText, centering it. Now that we have a button, let’s make it do something by writing some actual code! First, we need to get our Views from the activity_main.xml file into MainActivity.java. In our onCreate() method, we see the line setContentView(R.layout.activity_main); – signaling to us that the two files are now linked. We’ll access anything in the res directory with R. On the line after setContentView, assuming your EditText’s id is editText, add the following line (you may have to hit Alt + Enter to import the EditText class after typing this):
EditText editText = findViewById(R.id.editText);findViewById returns some type of View, and is fetched using R.id.whatever. If we type out editText. and look at the autocomplete results, we can see the associated methods, like getText() and setText(). Many of these methods will be not bolded, since they are methods of a parent class. Let’s go ahead and add the button on the next line.
Now we’ll go ahead and make the button do something by giving it an OnClickListener. Type out button.setOnClickListener(new OnCli..., and as you type, you should see an autocomplete option for View.OnClickListener. If you hit enter as this autocomplete option is showing, it will result in this:
button.setOnClickListener(new View.OnClickListener() {
    @Override
    public void onClick(View v) {

    }
});
What we see here is effectively a lambda – when the button is clicked, it will execute whatever is in this onClick method. For example, let’s add the code editText.setText("YOUR TEXT HERE"); inside the onClick method, and clicking the button will automatically fill out the editText with your text. OnClickListeners can be added to any View, but unlike the button class, many do not have the clickable attribute enabled by default, something you’ll have to do manually.
Side note: String resources
Just as we have layout resources and drawable resources, we also have string resources. String resources are stored in res/values/strings.xml and should be used whenever a string is going to be shown to the user (so not an internal string used by code.) These are good practice, since for bigger apps this makes translations much easier. If you’re following along, you’ll notice that “YOUR TEXT HERE” is highlighted in yellow, and hovering over it will tell you Android Studio wants you to use a string resource. Whenever something like this happens, hitting Alt + Enter will usually bring up an option to autofix it. Selecting “Extract string resource” will ask you what you want the string’s id to be and change it for you, getting rid of the annoying highlight and cleaning up your code!
Activities
For now, you can think of an activity as essentially one screen in Android (this gets more inaccurate the more you learn about Android), and typically corresponds to one layout file. This is where we handle the logic for the screen. Outside of your interactions with the Activity, it has a lifecycle with several interface methods to execute certain behavior at different points of its lifecycle.
Activity Lifecycle
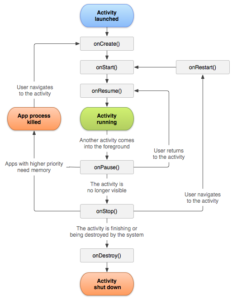
The Activity lifecycle can be tricky, but it’s important to understand that these are just a bunch of methods that are called automatically – you should never be trying to invoke these methods yourself. Instead, you’re supposed to override these methods and do your own custom behavior here, which is why we’ve been writing code in onCreate so far. They’re described better in the official documentation, but the general gist is as follows:
onCreateis called once when the screen is first initialized where you can set everything and do all of your logic for the activity, like setting listeners, etconPauseis called every time you switch to a different screen, a good place to stop background things like timers or download tasksonResumeis called every time you return to a screen, where you can restart whatever you paused in onPause. Note from the diagram that this is also called after onCreateonDestroy, which is called at the end when your app is completely closed, even in the background
In general, when overriding these methods, be sure to keep the original super method. Android Studio will complain if you take it out though, so it’s not too hard to remember.
Just to see this in action, let’s add a Toast (a special type of user facing text bubble) to pop up when our app is put into the background. Back to our MainActivity class, add an onPause method by typing out “onPause” somewhere outside onCreate and selecting the first autocomplete method. Inside the onPause method, typing in Toast will show an autocomplete method with the subtext “Create new Toast”, which will create a blank Toast for the user to see. You should end up with this code (try not to copy paste – the autocomplete is faster in the long run!)
@Override
protected void onPause() {
    super.onPause();
    Toast.makeText(this, "activity paused!", Toast.LENGTH_SHORT).show();
}
If you run the app now, then press the home button, you’ll see a bubble pop up on the bottom with your message! See if you can add a Toast that triggers when you open the app again.
Side note: Contexts
You may have noticed that the first argument to the Toast method was this, which in this case refers to our MainActivity. In reality, we are passing in a Context object – and every Activity extends the Context class (so MainActivity is a Context.) In general, a context is usually passed into a method that needs to know what the current Activity is. With a Context, you have access to pretty much all user facing methods like Toasts, findViewById, Intents, etc, and later on we’ll encounter many situations in which we don’t have a Context so it needs to be passed in as an argument.
Creating a new Activity
To create a new Activity, please don’t create your own Java file! Instead, right click the java folder and go to New -> Activity -> Empty Activity. For this exercise, name it ViewActivity, and if you’re following along with Git, once you hit finish you’ll be prompted to add the files to Git (please do so!) While we won’t use it right now, in the next part we’ll use the button to prompt the user for an image and add it to the ViewActivity with a caption for our very basic Snapchat clone!
Intents
Intents represent actions that can leave the Activity and do something else. With an Intent, you can do many things, such as open an activity (and pass data while doing so), open another app, or open an app / activity and receive a result back. In our demo, we’ll use intents to open an activity, open an activity and pass data to it, and open the camera app to get an image back.
Starting an Activity with Intents
Let’s edit our button to open the ViewActivity we just created. The syntax to create an Intent to go to another class is
Intent intent = new Intent(this, ViewActivity.class) // note the Context argumentand to actually execute our intent we say
startActivity(intent)Like findViewById, since we’re already in a Context (MainActivity is a context), we have access to startActivity without having to call the method from an object. Your button’s code should now look like
button.setOnClickListener(new View.OnClickListener() {
    @Override
    public void onClick(View v) {
        Intent intent = new Intent(MainActivity.this, ViewActivity.class);
        startActivity(intent);
    }
});
Don’t forget to clarify that we’re using MainActivity.this and not OnClickListener.this! It might not seem like it, but an anonymous class is still technically another class in Java.
Run your code, and your button should successfully be able to navigate to the new screen! By default, opening a new screen adds it to the back stack, meaning that the back button will automatically kill the current activity and move back to MainActivity, with appropriate animation.
Pass data through Intents
Hmm… our ViewActivity is looking pretty empty right now, let’s try displaying the text from MainActivity’s EditText in a TextView in ViewActivity! First, add a TextView to view_activity.xml and give it an appropriate id. Next, to pass data through the intent, we’ll add the line
intent.putExtra("text", editText.getText().toString()); // must be a string, getText returns an Editablewhich adds a key value pair to our intent, with whatever key you supplied and the text from your editText as the value. Now in ViewActivity we can retrieve this text with
String text = getIntent().getStringExtra("text");Here we get the intent using our special Activity exclusive method getIntent, and get the string extra we packed in with the intent using the key from earlier. We can now set our textView to be this text. Try it out yourself!
Getting an image from the camera
Instead of calling startActivity, starting an activity with the expectation of a result back is called with startActivityForResult() and the target activity returns back by calling setResult. The result is handled in a method we override called onActivityResult, similar to the lifecycle methods we implemented.
The tricky part of getting an image from the camera is finding out how to make the intent, since opening apps like the Camera have special codes instead of ActivityName.class. This is where you’ll utilize the most important skill in any software developer’s kit – Google! YMMV, but the first result when Googling “startActivityForResult camera intent” gave me the intent
Intent takePhotoIntent = new Intent(MediaStore.ACTION_IMAGE_CAPTURE);in addition to asking us to add this permission to the manifest
<uses-feature android:name="android.hardware.camera" android:required="true" />as a direct child of the manifest tag (not in the application tag.) However, it’s important to note that we also need to add an id to a request when you call startActivityForResult, so you can define
static final int CAMERA_REQUEST_ID = 42;in your MainActivity class. Now we can replace our onClick code again with
button.setOnClickListener(new View.OnClickListener() {
    @Override
    public void onClick(View v) {
        Intent takePhotoIntent = new Intent(MediaStore.ACTION_IMAGE_CAPTURE);
        startActivityForResult(takePhotoIntent, CAMERA_REQUEST_ID);
    }
});
In our onActivityResult then, we want to listen for the received data and do something with it. First we wrap everything in an if statement to ensure that we are actually receiving from the camera, and check the result code to make sure nothing went wrong. Then we retrieve the Bitmap by copy pasting from the Google result, and send it all to ViewActivity (along with our text) to end up with
@Override
protected void onActivityResult(int requestCode, int resultCode, @Nullable Intent data) {
    if (requestCode == CAMERA_REQUEST_ID && resultCode == RESULT_OK) {
        Intent intent = new Intent(MainActivity.this, ViewActivity.class);
        EditText editText = findViewById(R.id.editText);
        intent.putExtra("text", editText.getText().toString());
        intent.putExtra("image", (Bitmap) data.getExtras().get("data")); // from tutorial
        startActivity(intent);
    }
}
In order to continue, add an ImageView to activity_view.xml (I made it take up the whole screen) and bring the TextView to the front by setting the elevation attribute to 1 or 2dp. In ViewActivity, our onCreate should look like this:
@Override
protected void onCreate(Bundle savedInstanceState) {
    super.onCreate(savedInstanceState);
    setContentView(R.layout.activity_view);

    String text = getIntent().getStringExtra("text");

    // a bitmap extends the parcelable class, and java 8 will auto cast to bitmap in this line
    Bitmap bitmap = getIntent().getParcelableExtra("image");

    TextView caption = findViewById(R.id.caption);
    ImageView imageView = findViewById(R.id.imageView);

    imageView.setImageBitmap(bitmap);
    caption.setText(text);
}
If you’ve followed all the instructions, this should work! I added a couple styling things to make it slightly more like Snapchat, by setting the background of the text to #aa000000 (translucent black), the text color to white, the width to match_constraint, and the textAlignment to center. The source is here.